How to pick the right element without memorizing a chart, how the +25% skill pairing works, and where to spend coins and fortune, using the labels the game shows.
Jangseung Guard is a circular defense game: a village guardian post stands in the middle and yokai close in from every side. The guardian attacks on its own, so you only make two kinds of decisions. You switch its element, and you choose where to spend coins.
The JWorld team wrote this guide from the game's data and in-game hints. Every number matches the version that is live today. We start with the rule that makes the ×2 appear. You can follow along in the game itself.
The ×2 rule in one line
Every attack the guardian makes, skills included, uses its current element. You tap one of five talismans (Wood, Fire, Earth, Metal, Water) to change it, and the weapon changes with it. Yokai have elements too, and the pairing decides the damage.
| Relationship | Damage |
|---|---|
| Your element overcomes the yokai's | ×2 |
| The yokai's element overcomes yours | ×0.5 |
| Anything else | ×1 |
The overcoming cycle goes: Wood parts Earth, Earth dams Water, Water quenches Fire, Fire melts Metal, Metal cuts Wood. If you would rather not memorize that, use one line: switch to the element just before the yokai's in this loop: Wood → Earth → Water → Fire → Metal → (back to Wood). Earth is preceded by Wood, so Wood beats Earth.
| Yokai element | Tap this talisman | Talisman that deals ×0.5 |
|---|---|---|
| Wood | Metal | Earth |
| Fire | Water | Metal |
| Earth | Wood | Water |
| Metal | Fire | Wood |
| Water | Earth | Fire |
The game helps too. A chip over the field reads something like "Earth yokai! Wood ×2", the right talisman gets a ×2 badge, and a second chip such as "Next: Metal" shows the next wave's element in advance.
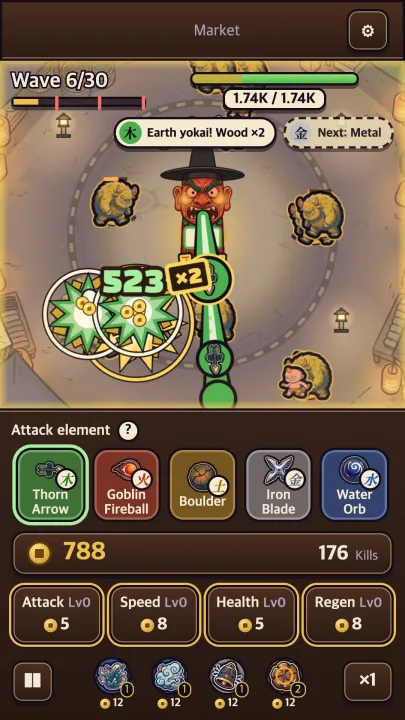
That screen is exactly this moment. The wave is mostly Earth yokai, so Wood (Thorn Arrow) is the talisman to use, and the next wave is Metal, which means Fire comes after.
When and how to switch
The rule is simple, but timing matters. A few numbers from the game's data:
- After you switch, you must wait 0.6 seconds before switching again. Mashing the buttons only hurts you.
- A new wave arrives every 20 seconds, even if yokai from the last one are still alive.
- About 70% of a wave's yokai share the announced element. The other 30% are mixed.
- Switching to the right element within the first 6 seconds of a wave counts as a counter win, and the game's hints taper off as your count grows.
So the routine looks like this:
- Read the "Next" chip before the wave changes. If it says Metal, keep a thumb near the Fire talisman.
- Switch right as the wave starts. With 70% of the wave in one element, the first seconds pay the most.
- Do not flip back for the other 30%. The cooldown costs you, and going to an element that loses to the leftovers risks ×0.5.
Each place also mixes in 10% more yokai of its own element: Pine Village is Wood, River Ferry is Water, Market is Fire, Mountain Fortress is Metal and Palace is Earth. In a given place your talisman choice leans slightly in one direction.
The game goes easy on you at first. A new profile's first three runs are gentle: before wave 10 they never bring the element that overcomes the guardian's own, so a player who has not learned to switch is not halved by a whole wave. That help ends after the third run, so use those runs to build the habit.
The three bosses and their answers
A boss arrives every ten waves. You defend a place by defeating the wave-30 boss.
| Wave | Boss | Element | Talisman to use |
|---|---|---|---|
| 10 | Gumiho | Fire | Water |
| 20 | Imugi | Water | Earth |
| 30 | Bulgasari | Metal | Fire |
The in-game tip says it plainly: "Bosses take ×2 from Water. Press the key when the boss lands." A boss makes a short entrance and cannot be hurt during it, so switch while it is still coming down.
Imugi and Bulgasari have thick shells that cut damage by 35%, so a missed ×2 costs even more time on them.
The second mode, Yokai Hunt, is this rule and nothing else. You get 60 seconds against one boss whose element changes every 8 seconds. The three skills are chosen for you at level 3, so the only thing that decides the fight is how fast you follow the element.
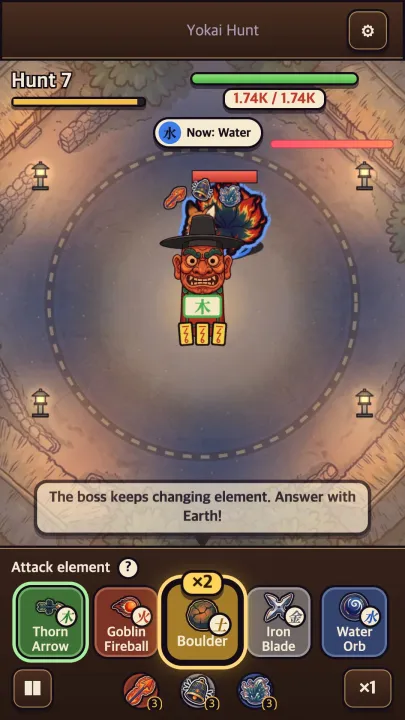
The chip on top is the boss's current element. It changes every 8 seconds, so you simply follow it. Every fourth Hunt level pays a relic, and one of them, the Five-color Pouch, raises counter damage from ×2 to ×2.3.
The skill card's +25%: matching pairs
After each wave you pick one of three skill cards. A run can hold six skills at most, and each skill levels up to 5, where it awakens and changes its effect.
Read the line at the bottom of a card: "Water · +25% on Wood". It means this skill's element (Water) feeds the guardian's current element (Wood). That is the generating cycle: Wood → Fire → Earth → Metal → Water → Wood.
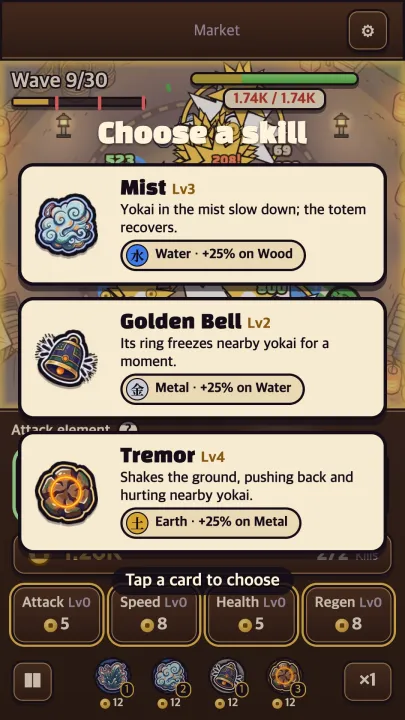
Join that with the earlier rule (switch to the element before the yokai's), and you get a quick lookup:
| Yokai element | You stand on | Skills that get +25% |
|---|---|---|
| Earth | Wood | Mist, Splash (Water) |
| Water | Earth | Fire Arrow, Dokkaebi Fire (Fire) |
| Fire | Water | Golden Bell, Iron Axe (Metal) |
| Metal | Fire | Pine Needles, Arrowroot Vines (Wood) |
| Wood | Metal | Tremor, Earthen Wall (Earth) |
If you spend most of your time on Wood, Water skills benefit. The Market sends a few more Fire yokai, so you will stand on Water more often there, and Metal skills fit. This is a rule of thumb worked out from the numbers. The ×2 still comes first: if you must choose between ×2 and +25%, take the ×2.
Skills also unlock at different points. Pine Needles, Fire Arrow, Tremor, Golden Bell and Splash are available from the start. Earthen Wall needs wave 8, Mist needs 3 runs and Arrowroot Vines needs wave 15. Dokkaebi Fire opens after your first boss, and Iron Axe after 3,000 counter hits.
Coins: the in-run upgrade order
You earn coins by defeating yokai during a run. There are four places to spend them, and the price grows with each level.
| Upgrade | Per level | Price, levels 1 to 4 |
|---|---|---|
| Attack | ×1.12 | 5, 7, 9, 11 |
| Speed | ×1.06 (capped at 6 attacks a second) | 8, 11, 15, 20 |
| Health | ×1.12 | 5, 7, 9, 11 |
| Regen | ×1.15 | 8, 11, 14, 18 |
There is also an upgrade for each skill. The number under a skill icon (12 at first) is its price, and every level adds 20% damage to that skill only. The prices go 12, 17, 24, 33.
Reading the numbers gives this order:
- Alternate Attack and Health. They cost the same and give the biggest step, ×1.12. The game's own tip tells you to buy Health a few waves ahead of a hard one.
- With coins left over, upgrade the skill you rely on. It is +20% for that skill alone, but worth it for your main damage dealer.
- Speed gives only ×1.06 per level and its price climbs fast, so it can wait.
- Regen is ×1.15, but the base is only 0.4 health per second, so on paper it is the weakest early pick.
A run usually lasts six to nine minutes, and coins keep coming in. Rather than pouring everything into one stat, steadily alternating two works well. This order is a guide derived from the data, not a law. If your runs end because of one weakness, fix that first.
Fortune: the permanent upgrade order
When a run ends you earn fortune, which buys permanent upgrades. A brand-new profile's first run pays at least 16, exactly enough for Hard Wood (5), Deep Roots (5) and Clear Spring (6).
| Permanent upgrade | Effect | Shows up at (best wave) |
|---|---|---|
| Hard Wood | Attack ×1.1 | from the start |
| Deep Roots | Health ×1.1 | from the start |
| Clear Spring | Regen ×1.12 | from the start |
| Coin pouch | Coins +8% | wave 3 |
| Quick Hands | Speed +3% | wave 5 |
| Lucky Pouch | Fortune +5% | wave 8 |
| Travel Money | +5 coins at the start of a run | wave 8 |
| Second Look | +1 skill reroll per run | wave 10 |
| Long Patrol | +1 hour of patrol while you are away | wave 10 |
| Sharp Eyes | Crit chance +1% | wave 12 |
| Far Sight | Range +2% | wave 15 |
| Wide View | Choose skills from four cards (600) | wave 20 |
Attack, Health and Regen start at 5 to 6 and grow by about 21% per level (×1.21). Sharp Eyes and Far Sight start at 20 and 25, and each level gives only a small gain. Early on, putting fortune into Hard Wood and Deep Roots and adding the Coin pouch once it appears is a sensible default. Second Look costs 80 and triples in price each level, so it tops out at 3. If you keep missing the skill you want, one level is worth buying.
You can also change guardians. The Great General is even all round, while the Sotdae watches the next wave and switches element for you. If the talismans feel hard, the Sotdae is a good practice partner, though its attack and health are a little lower.
Summary
- The guardian attacks with its current element: ×2 if it overcomes the yokai, ×0.5 if the yokai overcomes it.
- The talisman to use is the element just before the yokai's in the loop Wood → Earth → Water → Fire → Metal.
- After a switch you wait 0.6 seconds. Switch at the start of a wave, and during a boss's entrance.
- Beat Gumiho (Fire) with Water, Imugi (Water) with Earth and Bulgasari (Metal) with Fire. In Yokai Hunt the boss changes element every 8 seconds.
- The skill card's "+25%" is a pairing that feeds the element you stand on. Think about it after the ×2.
- Spend coins on Attack and Health first, and fortune on Hard Wood and Deep Roots first.
Ready to try it? Play Jangseung Guard.
Written by the JWorld team from our game design documents and measured play data, with AI tools helping with the writing.